Hacking a FiberHome ONU to replace a Vivo HGU
Patching a proprietary GPON ONU one byte at a time
Why
I want to replace my ISP’s all-in-one router (an Askey RTF8225VW provided by Vivo) with a dedicated setup: a dumb bridge ONU for the fiber, and a Raspberry Pi running Debian as the actual router. Full control over NAT, firewall, DNS, DHCP – the works.
I had a FiberHome AN5506-01-A lying around. Single fiber port, single Ethernet port, bridge-only. Exactly what I needed. The problem is that Vivo’s OLT (the ISP-side equipment that manages fiber subscribers) doesn’t just let any ONU onto the network. It expects to see specific identity parameters from the device, and if something doesn’t match, it refuses to provision it.
This is the story of extracting credentials from the Askey, dumping a 16MB flash chip, patching a proprietary ARM binary inside a compressed read-only filesystem, and flashing it all back. It didn’t fully work, but the journey was educational.
The plan
GPON authentication involves a handful of parameters that the ONU exchanges with the OLT during registration:
| Parameter | What it is |
|---|---|
| GPON Serial Number | Unique device ID, burned into the ONU |
| PLOAM Password | Shared secret for PLOAM-level auth |
| Equipment ID | Device model string reported via OMCI |
| Hardware Version | Board revision string |
| Software Version | Firmware version string |
| OMCC Version | OMCI protocol version byte |
The idea was simple: extract these from the working Askey, set them on the FiberHome, and have the OLT think it’s still talking to the same device.
Extracting credentials from the Askey
The Askey RTF8225VW is locked down. Telnet gives you a User> prompt with almost every show command returning “reserved for future”. No shell, no backup export, no way to pull configuration.
The GPON Serial Number was easy – it’s printed on the device label: TLCMXXXXXXXX.
The PLOAM password was harder. The admin web interface doesn’t show it. But Vivo’s installer page at /index_instalador.asp (login as instalador) embeds it in the HTML source as a JavaScript variable:
var gponPw='00000000000000000000';
Twenty hex characters, all zeros. Ten bytes of 0x00. Vivo authenticates by Serial Number only, the PLOAM is blank.
PPPoE credentials were visible in the WAN settings: cliente@cliente / cliente. Not exactly Fort Knox.
Getting root on the FiberHome
The FiberHome AN5506-01-A runs Linux on a HiSilicon SD5116 SoC. The web interface at 192.168.1.1 is basic and locked down, but the real access is through a hidden telnet service on port 26:
telnet 192.168.1.1 26
# Login: root (no password)
Full root shell. From here you can browse the filesystem, edit config files, and poke at the GPON internals.
The first thing to do was set the GPON Serial Number:
echo TLCMXXXXXXXX > /fhcfg/fh_pon/physicSN
echo > /fhcfg/fh_pon/logicSN
echo > /fhcfg/fh_pon/logicPWD
Reboot, connect the fiber, and the ONU reaches O5 state – registered with the OLT. The SN spoofing worked. But rx_omci: 0. The OLT accepted the registration at the PLOAM level but refused to start OMCI provisioning. It knew something was off.
Understanding the flash layout
This is where things get interesting. The ONU runs from a 16MB SPI NOR flash chip (MX25L12833F), and the kernel’s boot arguments reveal exactly how it’s partitioned:
mtdparts=hi_sfc:256k(boot),256k(env),1536k(kernel),5888k(rootfs_app),
         1536k(kernel),5888k(rootfs_app),1M(cfg)
Laid out visually:
Offset     Size     Name         Filesystem
0x000000   256KB    boot         U-Boot (bootloader)
0x040000   256KB    env          Raw (U-Boot environment variables)
0x080000   1.5MB    kernel       zImage (bank 0)
0x200000   5.75MB   rootfs_app   cramfs (bank 0)
0x7C0000   1.5MB    kernel       zImage (bank 1)
0x940000   5.75MB   rootfs_app   cramfs (bank 1)
0xF00000   1MB      cfg          jffs2 (/fhcfg)
MTD
MTD (Memory Technology Device) is Linux’s subsystem for raw flash chips. Unlike an SSD or SD card, SPI NOR flash has no controller. The OS manages erase blocks directly. There’s no MBR or GPT partition table – the kernel receives the partition layout as a boot argument from U-Boot and creates /dev/mtdblock0 through /dev/mtdblock6 accordingly.
Two filesystems
The flash uses two different filesystems for different purposes:
cramfs (Compressed ROM File System) is a read-only compressed filesystem. The entire OS, applications, and libraries live here. It’s efficient for embedded devices: small footprint, no write wear on the flash, and the kernel can mount it directly. The downside is obvious: you can’t change anything without rebuilding the whole image.
jffs2 (Journaling Flash File System 2) is a read-write filesystem designed for raw flash. It handles wear leveling and power-loss safety. The ONU uses it for the 1MB /fhcfg partition, which stores mutable config like the GPON SN, Wi-Fi settings, and PPPoE credentials.
zImage (compressed kernel image) The kernel partitions contain a zImage – a self-extracting compressed Linux kernel. When U-Boot loads it into RAM and calls bootm, the small decompression stub at the head of the image unpacks the real kernel in-place and jumps to it. It’s the standard format for ARM Linux on embedded devices where flash space is tight.
Dual banks
Notice the two copies of kernel + rootfs. This is an A/B update scheme. The OLT can push firmware updates to the ONU over OMCI. One bank is active, the other receives the update. If the update fails, the bootloader falls back to the working bank. The U-Boot env stores kernel_flag and rootfs_app_flag to track which bank is active.
The boot process
When the ONU powers on:
- U-Boot starts from offset 0x0, initializes RAM and SPI flash, reads its environment from the
envpartition. - It executes
bootcmd: copies the kernel from flash to RAM (sf read 0x80300000 0x80000 0x180000) and boots it (bootm). - The Linux kernel receives
bootargsincludingroot=/dev/mtdblock3 rootfstype=cramfs, mounts the cramfs root filesystem. - Init runs, mounts
/fhcfgas jffs2, then executes/fh/extend/initialize.sh. initialize.shloads GPON drivers, creates network interfaces (eth0, wan0, tel0, br0), and starts the main application binary/fh/extend/AN5506-01-A.- The main app loads
libnomci.sofor OMCI handling, connects to the GPON MAC hardware, and begins PLOAM registration with the OLT.
Flash → U-Boot → Kernel → mount cramfs → initialize.sh → AN5506-01-A
                                ↓
                          mount jffs2 → /fhcfg/
The OMCI identity problem
OMCI (ONU Management and Control Interface) is the protocol the OLT uses to configure the ONU after registration. It queries Management Entities (MEs) to learn about the device. The key ones:
- ONT-G (ME 256): Vendor ID, hardware version
- ONT2-G (ME 257): Equipment ID, OMCC version
- Software Image (ME 7): Firmware version
The FiberHome reports its own identity – AN5506-01-A, software R8.21.01.01, etc. The OLT expects to see the Askey’s identity: RTF8225VW, software R8225VWXXXXXX. Some of these values live in writable config files, but the critical ones are hardcoded in libnomci.so, a proprietary ARM shared library sitting on the read-only cramfs.
| Parameter | Location | Writable? |
|---|---|---|
| Hardware Version | /fhcfg/hw_version.ini |
Yes (jffs2) |
| GPON SN | /fhcfg/fh_pon/physicSN |
Yes (jffs2) |
| Equipment ID | libnomci.so offset 975768 |
No (cramfs) |
| Software Version | /fh/extend/info.ini |
No (cramfs) |
| OMCC Version | Hardcoded in libnomci.so |
No (cramfs) |
The writable ones were easy:
echo 'hardware_001=RTF8225VW' > /fhcfg/hw_version.ini
But to change the Equipment ID and Software Version, I needed to modify files inside the cramfs. That means dumping the flash, extracting the filesystem, patching files, rebuilding it, and flashing it back.
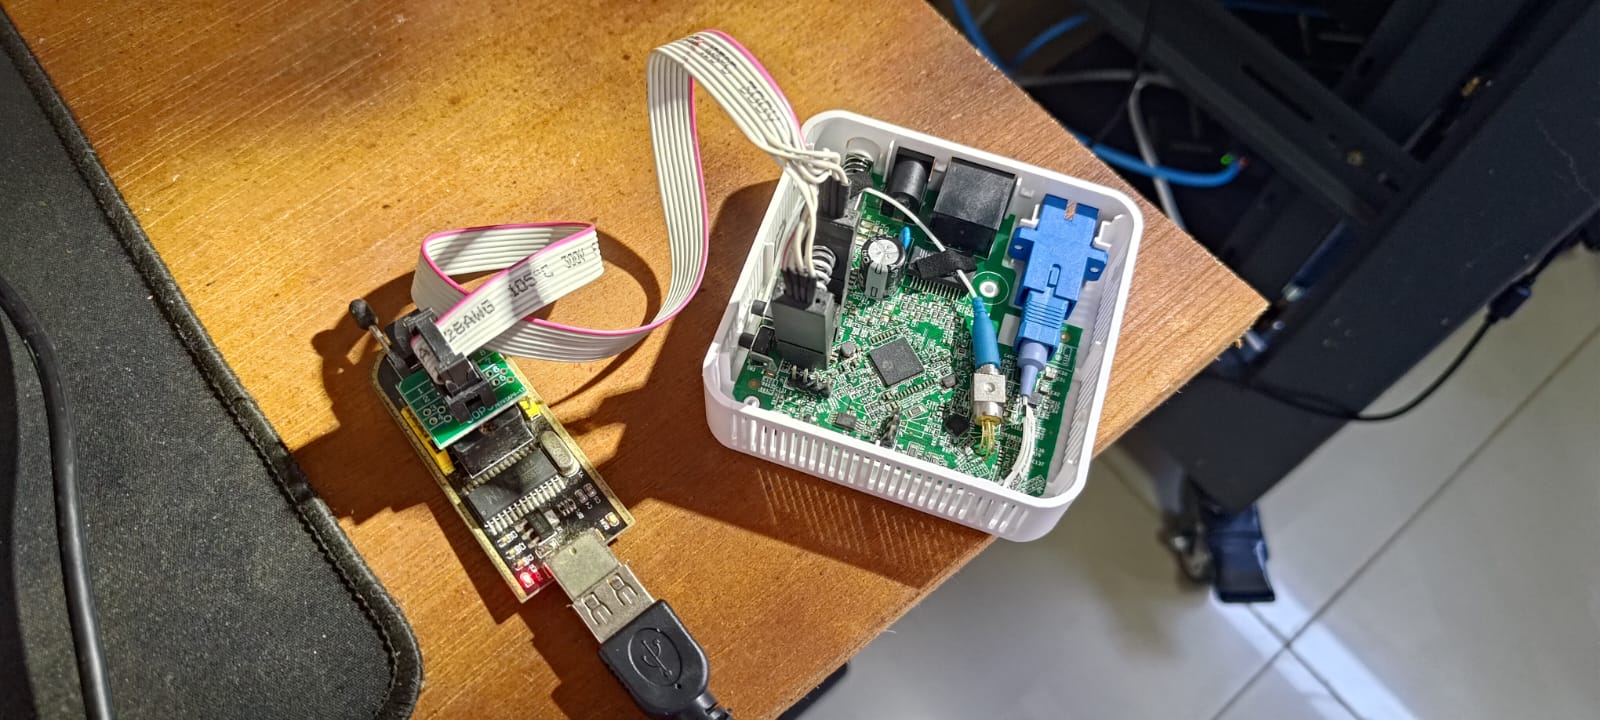
Dumping the flash with CH341A
The MX25L12833F is an 8-pin SOIC SPI NOR chip. To read and write it, I used a CH341A USB programmer with an SOIC8 test clip:
# Detect the chip (ONU powered off, clip attached):
sudo flashrom -p ch341a_spi

# Read the full 16MB twice and compare:
sudo flashrom -p ch341a_spi -c "MX25L12833F" -r ~/onu/onu_backup.bin
sudo flashrom -p ch341a_spi -c "MX25L12833F" -r ~/onu/onu_backup2.bin
diff ~/onu/onu_backup.bin ~/onu/onu_backup2.bin
# No output = reads match, good dump
One gotcha: the CH341A has two headers labeled 25XX and 24XX. The 25XX header is for SPI flash (what we need). The 24XX is for I2C EEPROMs. Another: the Linux ch341 serial driver grabs the device before flashrom can use it. If lsusb shows 1a86:5523 instead of 5512, run sudo rmmod ch341 and replug.
Extracting and patching cramfs
With the ROM dump in hand, I carved out the bank 0 rootfs (mtd3) and extracted it:
# Carve mtd3 from the ROM (offset 0x200000 = 2097152):
dd if=~/onu/onu_backup.bin of=~/onu/mtd3_cramfs.bin \
   bs=1 skip=2097152 count=5324800

# Extract the cramfs contents:
sudo fsck.cramfs --extract=~/onu/rootfs_extracted ~/onu/mtd3_cramfs.bin

# Make everything writable:
sudo chmod -R u+w ~/onu/rootfs_extracted/
Now I had the full filesystem on disk. Time to patch.
Equipment ID in libnomci.so
The string AN5506-01-A (the Equipment ID reported to the OLT) lives at offset 975768 in the 1.1MB ARM ELF binary libnomci.so. The replacement RTF8225VW is 9 bytes vs the original 11, so I padded with null bytes:
printf 'RTF8225VW\x00\x00' | dd of=~/onu/rootfs_extracted/fh/extend/libnomci.so \
   bs=1 seek=975768 conv=notrunc
Software version in info.ini
Straightforward text edit in /fh/extend/info.ini:
[software version]
software_version = R8225VWXXXXXX
Rebuilding and flashing
Rebuild the cramfs, splice it back into the ROM, and write it:
# Rebuild cramfs:
sudo mkfs.cramfs ~/onu/rootfs_extracted ~/onu/mtd3_patched.bin

# Splice into ROM at mtd3 offset:
cp ~/onu/onu_backup.bin ~/onu/onu_patched.bin
dd if=~/onu/mtd3_patched.bin of=~/onu/onu_patched.bin \
   bs=1 seek=2097152 conv=notrunc

# Flash it:
sudo flashrom -p ch341a_spi -c "MX25L12833F" -w ~/onu/onu_patched.bin
Verification after flashing:
strings /fh/extend/libnomci.so | grep RTF8225
# RTF8225VW
The patch took. The binary now reports RTF8225VW as the Equipment ID.
The result: still stuck
After flashing, the ONU registers (O5), but rx_omci stays at zero. The OLT still won’t provision it.
I caught something interesting in dmesg:
[PLOAM]ONUID(112): O4 => O5
[PLOAM]ONUID(112): O5 => O6
[PLOAM]ONUID(255): O6 => O1
O6 is POPUP – deactivation. The OLT actively kicks the ONU after registration, before any OMCI exchange even starts. This turned out to be caused by a leftover logicPWD field that was set to fiberhome (the FiberHome default). After clearing it:
echo > /fhcfg/fh_pon/logicPWD
The O5->O6 loop stopped. The ONU stays registered. But still rx_omci: 0. The OLT simply won’t talk OMCI to it.
There are more parameters to spoof – the OMCC version byte is still hardcoded somewhere in the ARM binary, and I haven’t confirmed the correct VLAN for my region (Vivo 2 might use VLAN 600 instead of 10). But at this point I’m patching a proprietary binary one byte at a time without documentation, and each iteration means a cramfs rebuild + CH341A reflash cycle.
What I learned
The flash layout matters. Understanding how the 16MB chip is partitioned into MTD blocks, which ones are cramfs (read-only) vs jffs2 (writable), and how U-Boot selects the active bank – this is foundational for any embedded hacking. The dual-bank A/B scheme is elegant: safe firmware updates with automatic fallback.
cramfs is a pain. Any change requires: dump flash, carve partition, extract filesystem, modify files, rebuild image, splice back, flash. A potential improvement is converting the rootfs to jffs2 (the kernel already has the driver for /fhcfg), making everything writable over telnet. One final flash, then never touch the CH341A again.
Proprietary GPON stacks are a wall. The SD5116 SoC has no public datasheet. The OMCI library is a closed ARM binary that talks to undocumented hardware registers. There’s no open-source GPON stack for this chip, and the hacking community (hack-gpon.org) works by modifying proprietary firmware, not replacing it. If you’re choosing an ONU for this kind of project, pick one with a Realtek RTL9601CI chipset – those have full community support and let you set every OMCI parameter from a shell command.
The right hardware makes all the difference. I spent days on cramfs extraction, binary patching, and flash programming. On a V-SOL V2801F (RTL9601CI), the same changes are:
flash set OMCI_EQ_ID RTF8225VW
flash set OMCI_SW_VER1 R8225VWXXXXXX
flash set OMCI_FAKE_OK 1
reboot
A few commands vs a multi-day reverse engineering project. The FiberHome adventure was a great learning experience about embedded Linux, flash memory, and GPON internals. But for actually getting internet working, the right tool matters more than the right hack.
But this is not over yet.